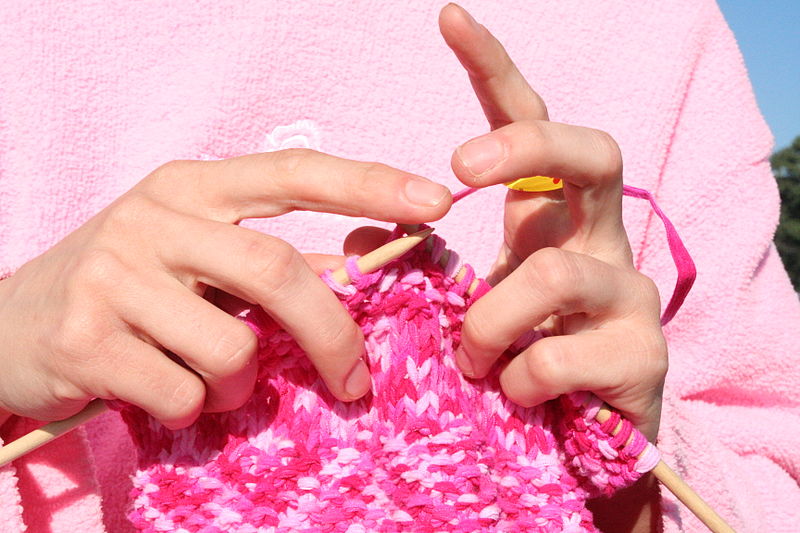
It came as a surprise three years ago when I started crocheting to hear people call it "knitting". Nobody who crochets or knits confuses the two, and most people who do a few textile arts can tell the difference at a glance. But a large number of people who don't do either craft haven't any idea how to distinguish them.
The sofa blanket and pillow above are both crochet. If you want to get fancy, the blanket is filet crochet. Filet crochet is a technique that uses two stitches of different sizes to create patterns, using the negative space generated by the smaller stitch for contrast.
If you see someone making fabric and are trying to tell whether it's crochet or knitting, the absolute giveaway for crochet is a hooked tool. If you aren't standing quite close enough to see whether there's a hook on the end, count the implements. One short tool is always crochet.
Crochet also holds very few stitches. If you see only one loop of yarn on the tool (or just a couple), you're looking at crochet.
Knitting uses at least two sharp ended needles with dozens of stitches all looped around the needles at the same time.
Knitting can be reproduced by machine, but crochet has to be made by hand. So everyone owns a lot of knitted items. T-shirts, socks, sweatpants, and mass produced sweaters are all knitted items. Crochet has its own distinct stitch patterns that won't look like anything in your sock drawer.
Knitting is good at creating soft stretchy fabric such as socks. Crochet tends to be stiffer so it's good for sturdy items such as placemats or tote bags. It's easier to make fancy patterns with crochet and crochet produces fabric somewhat faster than hand knitting.
Crochet is inherently denser than knitting and uses one-third more yarn to produce the same sized item. That sofa blanket in the photograph weighs about ten pounds.
----
Image credits:
http://en.wikipedia.org/wiki/File:Pink_knitting_in_front_of_pink_sweatshirt.JPG
http://en.wikipedia.org/wiki/File:Crochet-round.jpg
Wednesday, April 14, 2010
Tuesday, April 13, 2010
Neglected subjects
This morning Peter Weis and I were chatting, and I mentioned that I was learning to use a knitting machine. He replied that Singer was famous for their knitting machines, and it was a little while before we realized that he was thinking of sewing machines rather than knitting machines. So if you've never seen a knitting machine before, this is what one looks like. Sewing machines join fabric together; knitting machines generate knitted fabric.
That red strip hanging down from the device is a piece of knitting. It curls at the side because it is a stockinette stitch (stockinette stitches like to roll and curl; that's how they behave). This knitting machine has 50 hooks threaded, half of which I'm using to produce this item. Each hook holds one stitch of fabric. The purple item at right is a shuttle, which pushes the hooks and creates knitting stitches as it moves across the hook bed. I operate this shuttle manually; higher end knitting machines can be punch card driven or computerized.
The advantage of using a knitting machine is that it can generate an entire row of stitches in the time it would take to produce two or three stitches with regular knitting needles. This device can create rows up to 100 stitches wide, and with accessory extensions I could extend that as wide as the work table.
Knitting machines aren't like regular knitting needles, though. This doesn't pack into a tote bag and carry to Starbucks. It needs a fairly large work table with specific dimensions and it has to be clamped down. It also requires engineering skill: a lot of things can go wrong with the assembly and operation.
Each knitting machine can only do certain things. The hooks are sized to a given size of yarn and spaced at a fixed spacing, which means that one machine could produce baby blankets or heavy sweaters, but not both. This flat bed knitting machine will never make socks (unless you like a seam in your socks, which nobody does--seams in socks are uncomfortable).
Before getting the flat bed machine I tried the smaller circular machine at right. It operates on a crank and generates thin rounded pieces of knitting that are suitable for cords and edging.
The smaller machine is worth getting if this intrigues you. This device doesn't work on as many types of yarn as the manufacturer claims. I've had success only with acrylics and wools in baby yarn and sock yarn. It's almost a necessity to have a lace making crochet hook in order to correct for machine errors: these devices are prone to skipping and jamming.
Although once a piece gets started properly, this is far faster than manual knitting.
In recent years basic terms and concepts in textile arts have been fading from general knowledge. These days, "needlepoint" and "knitting" and "braiding" often get misapplied to things that are not needlepoint or knitting or braiding, because a lot of people don't know enough about these subjects to tell the difference. I've created a lot of the Wikimedia Commons textile arts categories; one has to know what one is looking at to sort the content.
I uploaded these photographs to Wikimedia Commons today; they might find their way into articles soon.
Wednesday, March 31, 2010
Wikipedia's Arbitration Committee implements genuine reform.
Good news at last: Wikipedia's Arbitration Committee has implemented a new system that saves weeks and months of hassle without any loss in quality over their previous system. Check it out here.
Saturday, March 20, 2010
Referencing comes full circle
I wonder whether amigurumi was invented to keep guys away from things. Drop an amigurumi on the remote control, send a shiver down his spine, and he leaves the room to hunt for leftover pizza while a woman settles in happily to watch the shopping channel. The cuteness factor on these things is absolutely repellent.
One of the areas where Commons and Wikipedia need more attention is textile arts. It's not as if men never touch the subject (here's a photograph of WMF volunteer coordinator Cary Bass's crochet project), but let's face it: women are underrepresented among editors and it's usually women who take an interest in the subject.
If a guy's going to work on textile arts it probably won't be amigurumi. It's a crochet form that originated in Japan to make miniature animals, such as the owl at right. I don't make them, but the quantity of amigurumi photographs at Wikimedia Commons had reached the point where a category was justified. So I made a new category today. It's the sort of housekeeping work that makes Wikimedia Commons useful and anyone can do it on subjects they happen to know.
Back at Wikipedia I added a {{Commonscat}} template at the amigurumi article to link to the new category. Then I looked at the article, which is a dreadful little stub whose only reference is an AOL blog that probably isn't reliable. So I looked for something better. Mostly the references on this type of subject aren't very good: they tend to be how-to books with a lot of patterns and minimal context. But that's better than nothing, right?
Um...
Here's an excerpt from the top return on Google Books: Amigurumi!: Super Happy Crochet Cute by Elisabeth A. Doherty
In Japan a crocheted or knitted doll is called an amigurumi (ah-mee-guh-ROO-mee). Disclaimer: Please, people. I do not speak Japanese. This pronunciation guide should be taken with a grain of salt. There is very little information available in English on Amigurumi, so I have decided to go with my own definition based on information I found in an online encyclopedia. Ami is a shortening of the word amimie, which means “stitch.” Gurumi is a shortening of the word nuigurumi, which means “stuffed doll or toy.” Smoosh the two together and you get amigurumi.The book was published in 2007 and that's reasonably close to Wikipedia's definition as it appeared at the end of 2006. I don't know if we'll ever get a reliable source on this stuff, but I'll keep looking.
Thursday, February 25, 2010
The good, the bad and the ugly
The following is a guest post by Peter Weis:
What is chromatic aberration?
“In optics, chromatic aberration (also called achromatism or chromatic distortion) is the failure of a lens to focus all colors to the same point”, is the first sentence in the Wikipedia entry on chromatic aberration. Basically light enters a lense in the same, aligned direction but due to the mechanical advice and its imperfection – the light leaves the lense in several unaligned directions.
We should leave the technical question at this point as well. For further information I recommend the full article.
How does that affect an image?
Chromatic aberration looks like “purple fringing”. On the image below you can see longitudial chromatic aberration. In this case all edges of your subject have purple fringes. If there are additional green fringes you speak of lateral chromatic aberration. Again for further technical information I recommend reading the article on purple fringing.
The good
The most convenient solution for chromatic aberration is using Adobe's Camera Raw. For those amongst you who use Photoshop but never headed for Camera Raw here you go.
Camera Raw is freeware that enables you to work with the raw material from your DLSR. To explain the full workflow and the advantages and disadvantages of Camera Raw would be enough information for a second article – so let us focus on dealing with chromatic aberrations and purple fringing. I recently edited a map of the South Pole which had some problems.
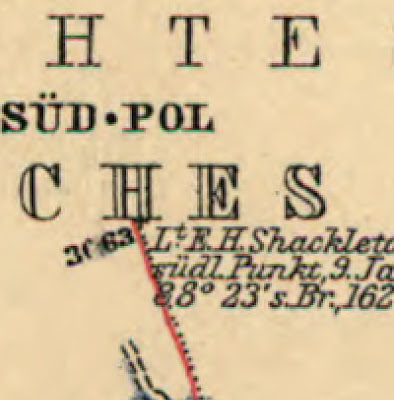
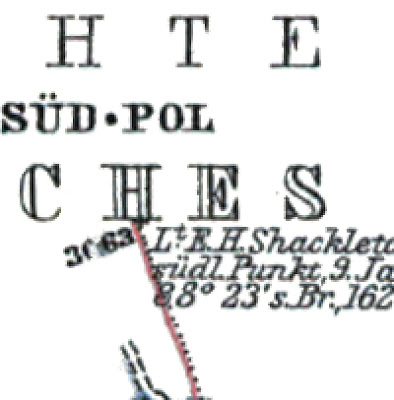
This image was cropped at 400% - the occurring greenish/reddish fringing is between 1-3 pixels. First step is to open your Raw file with Photoshop. If Camera Raw is already installed, this should be possible by double-clicking the file.
Note: If your file is not a Raw file you could nonetheless open it using Camera Raw. Here's a short how to:
Photoshop >>> File >>> Open as…

>>> [yourfile].[yourimageformat] >>>
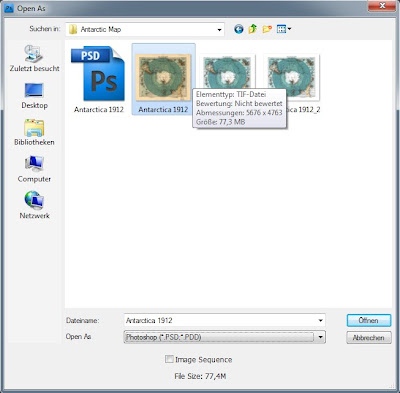
Open as: Camera Raw
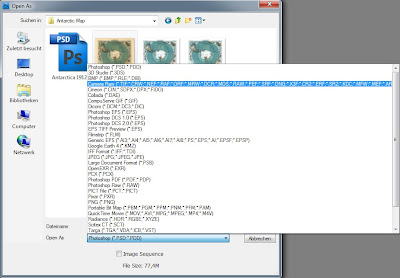
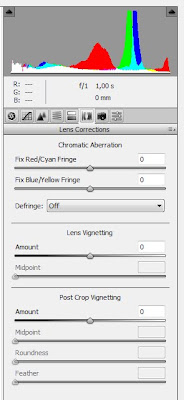 In the next step the Raw dialog should open up. The third tab from the right is “lens correction” – that’s where we will start working. The section “Chromatic Aberration” is almost self-explanatory. Depending on the colour fringing of your image you either adjust red/cyan or blue/yellow. The larger the colour fringing the easier to remove it – but don’t panic if otherwise.
In this case you could use “Defringe: All Edges” or “Defringe: Hightlight Edges“. “Defringe: All Edges” will remove the colour fringing, but also results in subtle grayish lines. For my image this solution appeared to be the optimum. The defringed image tends to be a little bit desaturated, so I recommend you to slightly increase the saturation and if needed contrast. It might be helpful to have the original layer and the adjusted layer in your layers palette to directly compare what values of saturation/contrast fit the most for your project. “Defringe: Highlight Edges” is to be used if most of the colour fringing occurs in edges of highlighting, which is quite often the case. Just feel free to play around with the sliders.
After a few hours of work including temperature, levels, curves, saturation and restoring the map the finished version looks like this:
What is chromatic aberration?
“In optics, chromatic aberration (also called achromatism or chromatic distortion) is the failure of a lens to focus all colors to the same point”, is the first sentence in the Wikipedia entry on chromatic aberration. Basically light enters a lense in the same, aligned direction but due to the mechanical advice and its imperfection – the light leaves the lense in several unaligned directions.
We should leave the technical question at this point as well. For further information I recommend the full article.
How does that affect an image?
Chromatic aberration looks like “purple fringing”. On the image below you can see longitudial chromatic aberration. In this case all edges of your subject have purple fringes. If there are additional green fringes you speak of lateral chromatic aberration. Again for further technical information I recommend reading the article on purple fringing.
The good
The most convenient solution for chromatic aberration is using Adobe's Camera Raw. For those amongst you who use Photoshop but never headed for Camera Raw here you go.
Camera Raw is freeware that enables you to work with the raw material from your DLSR. To explain the full workflow and the advantages and disadvantages of Camera Raw would be enough information for a second article – so let us focus on dealing with chromatic aberrations and purple fringing. I recently edited a map of the South Pole which had some problems.

This image was cropped at 400% - the occurring greenish/reddish fringing is between 1-3 pixels. First step is to open your Raw file with Photoshop. If Camera Raw is already installed, this should be possible by double-clicking the file.
Note: If your file is not a Raw file you could nonetheless open it using Camera Raw. Here's a short how to:
Photoshop >>> File >>> Open as…

>>> [yourfile].[yourimageformat] >>>

Open as: Camera Raw

 In the next step the Raw dialog should open up. The third tab from the right is “lens correction” – that’s where we will start working. The section “Chromatic Aberration” is almost self-explanatory. Depending on the colour fringing of your image you either adjust red/cyan or blue/yellow. The larger the colour fringing the easier to remove it – but don’t panic if otherwise.
 In this case you could use “Defringe: All Edges” or “Defringe: Hightlight Edges“. “Defringe: All Edges” will remove the colour fringing, but also results in subtle grayish lines. For my image this solution appeared to be the optimum. The defringed image tends to be a little bit desaturated, so I recommend you to slightly increase the saturation and if needed contrast. It might be helpful to have the original layer and the adjusted layer in your layers palette to directly compare what values of saturation/contrast fit the most for your project. “Defringe: Highlight Edges” is to be used if most of the colour fringing occurs in edges of highlighting, which is quite often the case. Just feel free to play around with the sliders.
After a few hours of work including temperature, levels, curves, saturation and restoring the map the finished version looks like this:

Subscribe to:
Posts (Atom)


